1. Getting Started
To work successfully with the programs needed for PRC2, you need to install them first. Properly installing Java and other programs is not hard but must be done precisely. What will follow is a description on how to do that under Ubuntu Linux, macOS and Windows. You can adapt this configuration for other operating systems too, possibly with a few tweaks.
|
It is best to get fairly familiar with the command line pretty soon, because in the end it will make you much more effective. Since 2018, bash is also available on Windows 10, and it is the default shell of Ubuntu-Linux and was the default shell on macOS until version 10.15. The default shell on macOS is now Zsh, we will specify the differences between bash and zsh where necessary. |
|
Before you install any software from the internet, please validate the the package. You typically see signature files such as SHA-256 or PGP-ASC, os something similar, which can help to ascertain that the package is the one you think it is. For instance with: You can check the download of that version of netbeans, and the command should produce the same signature as is available on the download website. |
2. Setting up the correct environment
2.1. Install Java
The default installation paths are:
/usr/lib/jvm
/Library/Java/JavaVirtualMachines/
C:\Program Files\AdoptOpenJDK\
|
Do NOT use |
Installation of Java can be done either through a package manager or by downloading the the Java distribution from Adoptium . For PRC2 we will use Java 17 as a minimum, but you may want to pick up Java 11 for older projects and maybe Java 18 too.
2.1.1. Linux
|
We are using Debian based Linux, such as Ubuntu, for the instructions on this page. We assume that that if you are running a different distribution of Linux that you can adapt the instructions to apply to that distribution (e.g. use the correct package manager Zypper, PacMan, etc.). |
Manual installation:
In the example below we assume that the distribution is packed as a tar.gz archive.
The example shows the archive name as of 21 November 2021,
OpenJDK17U-jdk_x64_linux_hotspot_17.0.1_12.tar.gz
sudo mkdir -p /usr/lib/jvm
cd /usr/lib/jvm
sudo tar xf ~/Downloads/OpenJDK17U-jdk_x64_linux_hotspot_17.0.1_12.tar.gz
2.1.2. macOS
With HomeBrew:
brew tap AdoptOpenJDK/openjdk
brew install --cask adoptopenjdk17
Manual installation:
Download the correct distribution/version of choice from Adoptium . Install the same way as normal programs.
2.1.3. Windows
With Chocolatey:
choco install adoptopenjdk17 --params="/ADDLOCAL=FeatureMain,FeatureEnvironment,FeatureJarFileRunWith,FeatureJavaHome /INSTALLDIR=C:\usr\lib\jvm\ /quiet"Manual installation:
Download the correct distribution/version of choice from Adoptium . Install the same way as normal programs,
|
Do NOT forget to change the install path during installation. |
2.2. Make Java available on the PATH
If you used a package manager or an installer to install Java, then Java should already be added to your path. However if you manually extracted the binaries then you should still add Java to the path.
The $PATH environment variable is used by the command line processor to find the commands or programs whose name you type as first word in a command line.
If you type java -version, and your shell says command not found, then your path does not include the java program yet.
Since we want the best Java experience, we will use some common environment variables.
2.2.1. Linux
JAVA_HOME Define JAVA_HOME first. That will help Java, but also tell other programs to find the desired Java version.
export JAVA_HOME=/usr/lib/jvm/jdk-17.0.15+6/ (1)| 1 | Path for manual installation |
PATH Prepend the directory under JAVA_HOME to your path, so all java related programs, such as java , javac, jar etc can be found, by just typing the name.
export PATH=${JAVA_HOME}/bin:$PATHTo avoid having to do this every time you start the command-line, add the commands to your ~.bashrc script file, at the bottom.
~/.bashrcexport JAVA_HOME=/usr/lib/jvm/jdk-17.0.15+6
export PATH=${JAVA_HOME}/bin:$PATH2.2.2. macOS
These instructions will guide you to setup the correct environment on macOS and to make it easy to switch between Java versions.
/usr/libexec/java_home (1)
/usr/libexec/java_home -V (2)| 1 | List the most recent version of Java on your system |
| 2 | List all installed versions of Java on your system |
We can now setup an environment to easily switch between Java versions and later on even launch Netbeans with the intended Java version.
The only thing we need to do for this is set the JAVA_HOME environment variable to link to the correct Java version.
JAVA_HOME environmentexport JAVA_HOME=<path_to_java_home>Where the <path_to_java_home> can be obtained by:
/usr/libexec/java_home -v '17*' (1)
/usr/libexec/java_home -v '17.0.2'(2)| 1 | Retrieve the path to Java 17 if installed |
| 2 | Retrieve the path to a specific subversion of Java 17 |
JAVA_HOME is set correctlyecho $JAVA_HOMEHowever instead of hardcoding the path it is better to retrieve the path while setting the environment.
JAVA_HOME dynamically with the following command (e.g. for Java 15):export JAVA_HOME=$(/usr/libexec/java_home -v '17*') (1)| 1 | $() means that the invocation between parenthesis is resolved first. |
This sets the correct Java environment for your current Terminal session. When opening a new terminal the default Java environment will be active again. To make switching between Java versions in the terminal easier we can set-up what is called an alias. An alias is basically a shortcut, you specify the keyboard shortcut and which commands should be executed. We want these aliases to always be available, for this we need to let the terminal know to load our aliases on startup. Depending on the type of terminal you are using, we need the specify the aliases at different places.
Since macOS Catalina (10.15) the default shell (which is used by the terminal) is ZShell (zsh).
This means we can specify our aliases in either .zshrc or in .zprofile in our home directory.
export JAVA_HOME=$(/usr/libexec/java_home -v 17) (1)
alias j11="export JAVA_HOME=`/usr/libexec/java_home -v 11`; java -version" (2)
alias j17="export JAVA_HOME=`/usr/libexec/java_home -v 17`; java -version" (3)| 1 | Set the default version of Java to version 17. |
| 2 | Alias to set the Java environment to version 11. |
| 3 | Alias to set the Java environment to version 17. |
We now need to either restart the terminal for the aliases to take effect or source the .zshrc file.
source ~/.zshrc
We can now check that switching between versions works:
java -version (1)
j11 (2)
j15 (3)| 1 | Check that the default Java version is correct |
| 2 | Check that switching between versions works |
| 3 | Check that switching between versions works |
Now we have set-up a way to easily switch between Java versions in the terminal.
2.2.3. Windows
Java should already be added to the path by the installer, as it is a default setting during installation.
2.3. Install Apache Maven
We will use Apache Maven, or maven for short throughout the PRC2 course, so you will need that too.
The application is called Maven but as command spelled as mvn.
Maven is the default build tool in the Java world and can build your program from sources without the use of and IDE. This makes your project agnostic to the IDE used, so they work with NetBeans as first class projects out of the box and also with other IDEs with little or no tweaks to that IDE. It is also the way the teachers use to compile and test the students work for the practical assignments and performance assessments.
2.3.1. Linux
Install with package manager:
sudo apt install mavenInstall manually:
Fetch a fresh copy of Apache Maven from the website.
To install it, do (example uses version 3.9.11 as of 2025-09-22)
cd /usr/share
sudo rm -fr maven
sudo tar xf ~/Downloads/apache-maven-3.9.11-bin.tar.gz
sudo ln -sf apache-maven-3.9.11/ maven
cd /usr/bin
sudo ln -sf ../share/maven/bin/mvn .
Once this is done, entering mvn --version should produce output similar to
hom@threehundred: /usr/share
🐧$ mvn --version
Apache Maven 3.9.11 (a0360b3cef57eeee480750d869b7f9d98cc2a333)
Maven home: /usr/share/maven
Java version: 17.0.15, vendor: Eclipse Adoptium, runtime: /usr/lib/jvm/jdk-17.0.15+6
Default locale: en_US, platform encoding: UTF-8
OS name: "linux", version: "6.14.0-29-generic", arch: "amd64", family: "unix"
h
2.3.2. macOS
Install with HomeBrew:
brew install mavenInstall manually:
Same instructions as for Linux.
2.3.3. Windows
Install with Chocolately:
choco install maven
Install manually:
-
Download the zip file from https://maven.apache.org/download.cgi.
-
Extract the zip file to
C:\usr\lib -
Add the
bindirectory to thepath-
Goto
Settings > About > Advanced System Settings > Adavanced Tab > Environment Variables -
Select
PathandEdit -
Newand fill in the pathC:\usr\lib\apache-maven-3.6.3\bin
-
-
Close
System Properties -
Start
cmd -
mvn -vshould return a version
2.4. Install or update your IDE
The official Java IDE at Fontys ICT Venlo is Apache NetBeans IDE. The long time stable version for the moment is 12.0. At the time of writing version 12.2 serves me very well. At the time of reading a newer version might be available.
2.4.1. Linux
You can either install Netbeans from Ubuntu Software or download the binaries.
To install the binaries of Apache NetBeans on Ubuntu simply fetch the binary as zip file and unpack it,
then either add the contained bin directory to the path, or make a wrapper netbeans
command in your personal ~/bin directory.
For my installation I simply used the binaries, in the zip file, and install it
in the traditional (as in same directories as the installer would) /usr/local.
/opt is also a good choice as installation directory.
cd /usr/local
sudo unzip ~/Downloads/netbeans-27-bin.zip
sudo mv netbeans{,-27}
For extra creature comfort, add a simple netbeans script to your path
#!/bin/bash
/usr/local/netbeans-27/bin/netbeans "$@" & (1)| 1 | Invoke netbeans using its absolute path. |
Then make that script executable with chmod +x netbeans.
NetBeans IDE should now be startable from the command line (fine for me) as well as from the menu.
2.4.2. macOS
It is possible to install Netbeans by downloading the installer, manual extracting the binaries of by using HomeBrew.
Installing with the installer:
-
Download the installer from https://netbeans.apache.org/download/index.html
-
Install as normal
brew install --cask netbeansInstalling the binaries manually:
See instruction of Linux.
As an extra we can start Netbeans from the command-line using the Java version we want to use.
We do this by adding an executable file to the PATH so we can start Netbeans from the terminal with the correct Java version.
netbeans file in /usr/local/bincd /usr/local/bin (1)
touch netbeans (2)
echo \"/Applications/NetBeans/Apache NetBeans 12.5.app/Contents/Resources/NetBeans/netbeans/bin/netbeans\" --jdkhome \$JAVA_HOME \$\* \& > netbeans (3)
chmod +x netbeans (4)| 1 | Change to the right directory |
| 2 | Create new file called netbeans |
| 3 | Write the correct command into netbeans |
| 4 | Make the file executable |
As you can see, when invoking it this way, you can inform Netbeans about which java version to use (as set in your JAVA_HOME environment variable).
Furthermore you can pass the project name as a parameter (defined by $*`) so you don’t need to open the project manually anymore in NetBeans.
Finally the & means that NetBeans runs as a background process without blocking your Terminal session, so your Terminal session is immediately available again.
myProject in Netbeans using Java version 17j17
netbeans myProject2.4.3. Windows
-
Download the installer from https://netbeans.apache.org/download/index.html
-
Install as usual, make sure to change to
path
2.4.4. Other IDE’s
This section is left empty. We will not answer any support questions on other IDE’s but the one we use in the performance assessment.
2.5. Subversion
Subversion is a version control system, that will be used in this course. You might have used git before, which is also a version control system. However subversion works a bit different, as it is not decentralized as git. For this course you do not have to know the commands for subversion as you will be using it from inside Netbeans.
However for Netbeans to be able to work with subversion there should first be a subversion command line tool be installed on the system.
2.5.2. macOS
On older versions of macOS subversion was supplied with XCode. However on newer versions of macOS this is no longer the case and we need to manually install it. The easiest way to do this is using HomeBrew:
brew install subversion2.5.3. Windows
-
Download TortoiseSVN
-
Make sure to install the
command line toolsduring installation -
Open command prompt and check that svn is added to the path with
svn --version
3. Testeasypom 4.0.6
Spelled all lower case: testeasypom, is a super pom to use in Fontys Venlo projects. It keeps your own pom.xml file simple and focused to declare just the
dependencies needed. Niceties to do proper Test Driver Development are provided for in the testeasypom definitions, including things as being able to create
javadoc in a professional looking way, including code highlighted code snippets, checkstyle, reporting, code coverage with maven, pmd, spotbugs etc.
-
testeasypom declares no dependencies other than those for dynamic (e.g. JUnit, AssertJ etc) and static testing in the form of plugins and their configuration.
This way of using maven, having a super or parent pom defined globally (in a repository, not on a local path), is the modern usage. It can be seen in well known big java projects such as Spring Boot and quarkus, to name two contenders in the java-web technology world.
|
Note that we are using a separately installed maven (3.8.4 at the time of writing) which you can download from apache maven, not the one bundled with NetBeans or any other IDE. You can tell NetBeans (via tools→ options →java→maven) to use the installed one instead of the bundled one. Our tests will always use maven, not some IDE. There is no gnome inside the build server to move the mouse. |
    <parent>
      <groupId>io.github.sebivenlo</groupId>
      <artifactId>testeasypom</artifactId>
      <version>4.0.6</version>
      <relativePath/> (1)
</parent>| 1 | The parent pom does not live in a local directory near (relative to) the project, but instead in a repository. This makes a parent pom 'portable'. |
All of the starter projects we provide already use this parent in some version. To get those working, apply the settings show in the paragraph Configuring Maven.
If you want to use testeasypom in your own project, either copy the parent definition into the pom file or start by replacing the NetBeans provided pom.xml file in your project by the basic one below. Add dependencies as required.
<?xml version="1.0" encoding="UTF-8"?>
<project xmlns="http://maven.apache.org/POM/4.0.0" xmlns:xsi="http://www.w3.org/2001/XMLSchema-instance" xsi:schemaLocation="http://maven.apache.org/POM/4.0.0 http://maven.apache.org/xsd/maven-4.0.0.xsd">
    <modelVersion>4.0.0</modelVersion>
    <parent> (1)
        <groupId>io.github.sebivenlo</groupId>
        <artifactId>testeasypom</artifactId>
        <version>4.0.6</version>
        <realtivePath/>(2)
    </parent> (3)
    <groupId>io.github.sebivenlo</groupId>
    <artifactId>basicsebimaven</artifactId>
    <version>1.0</version>
    <packaging>jar</packaging>
    <!-- The name in the IDE -->
    <name>My App</name>
    <properties>
        <project.build.sourceEncoding>UTF-8</project.build.sourceEncoding>
        <java.release>11</java.release>
        <!-- change mainClass to the proper starting point of your program, if any.-->
        <exec.mainClass>basicsebimaven.Hello</exec.mainClass>
    </properties>
    <dependencies>
      <!--example  -->
      <dependency>
        <groupId>...</groupId>
        <artifactId>...</artifactId>
        <version>...</version>
      </dependency>
    </dpendencies>
</project>| 1 | Start of parent declaration. |
| 2 | Parent comes from some other repo, not local. |
| 3 | End of parent declaration. |
3.1. Sebipom and Java FX
If you want to use semipom and build a JavaFX project, you need to activate the fx-profile. In the commandline that would be

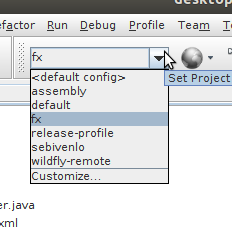
In netbeans you can do that by setting the configuration like in this picture:
3.2. Using the SeBiPom in your own projects
To use the test libraries and other goodies that will be used throughout our course,
you should add the testeasypom as parent.
Modify the pom.xml file in your project to include testeasypom as parent by adding these lines in the previous section Setting testeasypom as parent..
|
As of 2022-01-25, testeasypom reached version 4.0.6. Not all projects may have this version number for
the parent testeasypom. We improve as we go, sometimes because of tips we receive from our students, you for instance.
Anyway, if the version is not at the newest, set it to the newest and rebuild.
Revisit this part of the site to check the latest version number or look in the
fontysvenlo maven reposity
for the testeasypom version.
|
3.3. Upgrade all projects with one command
Since testeasypom is a somewhat moving target, you may have to update the parent pom of the projects that depend on it. All PRC2 projects do. This oneliner will do that for all projects below the current directory. After navigating to the parent of all such projects, do this in the shell:
for i in $(find . -name pom.xml); do (cd $(dirname $i); mvn versions:update-parent & ) ; doneIt works on any bash supporting machine, tested on ubuntu and should work on OS-X and under windows when using git-bash or the windows subsystem for Linux.