1. Security
Security is an important aspect of programming. By applying security principles while programming we can prevent bugs and exploits. These exploits could lead to data leakage, (distributed) denial of service (DDOS) or even remote code execution.
We will look back at subjects that were discussed in previous weeks and see common security mistakes and how we can prevent them.
1.1. Java (security)
Lets first have a closer look at how Java works and what mechanisms it has in place to help the developer prevent bugs (that could potentially lead to security exploits).
These chapters are based on chapter 10 of Core Java, Volume II—Advanced Features.
1.1.1. Class loader
The Java compiler (javac) converts the source code into code for
the Java Virtual Machine (JVM). This virtual machine code is
stored in .class files. Each class file contains the definition
and implementation for one class or interface.
The virtual machine loads these classes using the class loader. There are three different class loaders:
-
Bootstrap class loader: loads classes from a couple of base modules and some internal JDK modules
-
Platform class loader: loads all classes of the Java platform not loaded by the bootstrap class loader
-
System (or Application): loads classes from the module path and the class path
Sow how does the JVM load a class:
-
First it checks if the class is already loaded
-
If it is already loaded it will use the loaded class
-
-
If not loaded the JVM requests the class loader to load the class
-
The System class delegates the loading of the class to the Platform class loader
-
The Platform class loader delegates the loading of the class to the Bootstrap class loader
-
The Bootstrap class loader searches if the class is available in the Bootstrap JMOD files
-
If available then it will load the class
-
Else it delegates loading back to the Platform class loader
-
-
The Platform class loader searches if the class is available in the Platform JMOD files
-
If available then it will load the class
-
Else it delegates loading back to System class loader
-
-
The System class loader searches if the class is available on the class path or module path
-
If available then it will load the class
-
Else it will throw a ClassNotFoundException
-
These different class loaders can be seen in action in the following code snippet.
import java.sql.SQLInput;
import java.util.List;

public class Main {
    public static void main(String[] args) {
        System.out.println(List.class.getClassLoader());
        System.out.println(SQLInput.class.getClassLoader());
        System.out.println(Main.class.getClassLoader());
    }
}

// Output
//
// null
// jdk.internal.loader.ClassLoaders$PlatformClassLoader@3cd1a2f1
// jdk.internal.loader.ClassLoaders$AppClassLoader@55054057
Security
There a different types of class loaders, one of which is the
URLClassloader, this one can, as the name suggests, load classes
from an URL. Lets have a look at an example, first create the
class we want to load
public class Printer{
        public Printer(){
                System.out.println("Hello there from the internet");
        }
}
Now compile the class and start a simple server that can serve the compiled class file.
javac Printer.java
python3 -m http.server 8080
Now we can load the class from the server.
public class Main {
    public static void main(String[] args) {
        try {
            URLClassLoader loader = new URLClassLoader(new URL[] { new URL("http://localhost:8080/") });
            Class c = loader.loadClass ("Printer");
            Object o = c.getDeclaredConstructor().newInstance();
        } catch (Exception ex) {
            Logger.getLogger(Main.class.getName()).log(Level.SEVERE, null, ex);
        }
    }
}
// Output
//
// Hello there from the internet
This of course means that whatever class we load can do everything on the file system e.g. read files, make requests.
Loading files via HTTP is of course not safe as the identity of the server cannot be established. Same goes for HTTPS if the application doesn’t verify the certificate (which is not unheard of).
For a real life example of a class loader exploit have a look at https://knowledgebase.progress.com/articles/Article/How-to-prevent-Java-RMI-class-loader-exploit-with-AdminServer, where it was possible for unauthenticated users to load arbitrary classes via an exposed Java Remote Method Method Invocation (RMI) service.
1.1.2. Byte code verifier
So now we know how the JVM loads class files. But what are these files and how does the JVM interpret them?
Java source code is first compiled to an intermediate representation called Java bytecode. This bytecode can then be interpreted by the Java Virtual Machine (JVM). The specification of the Java bytecode and the JVM can be found here.
This way developers only have to write and compile the Java code once and they can run it on all platforms that have a JVM implementation available.
Lets have a look at how the Java compiler compiles a source file (Verifier.java) to byte code (Verifier.class).
package verifier;

public class Verifier {
    public static void main(String[] args) {
        System.out.println("1 + 2 = " + calc());
    }

    public static int calc(){
        int x = 1;
        int y = 2;
        int result = x + y;
        return result;
    }
}javap -c verifier.Verifierpublic static int calc();
Code:
0: iconst_1 // 0x04: Push int constant 1 onto operant stack
1: istore_0 // 0x3B: Store int into 1st local variable
2: iconst_2 // 0x05: Push int constant 2nd onto operant stack
3: istore_1 // 0x3C: Store int into second local variable
4: iload_0 // 0x1A: Load int from 1st local variable
5: iload_1 // 0x1B: Load int from 2nd local variable
6: iadd // 0x60: Add int
7: istore_2 // 0x3D: Store int in 3rd local variable
8: iload_2 // 0x1C: Load int from 3rd local variable
9: ireturn // 0xAC: Return int from methodBefore the bytecode is loaded by the class loader it is first verified. You might ask yourself why does the class file needs to be verified before it’s loaded. As we have seen in the previous chapter class files can be loaded from anywhere and there is no guarantee that the class file is not corrupted.
The class loader verifies the following properties:
-
Variables are initialized before use
-
Method calls match the types of object references
-
Rules for accessing private data and method are not violated
-
Local variable accesses fall within runtime stack
-
The runtime stack does not overflow
So what happens if we try to load a class that doesn’t pass any of
these checks? Lets change the Verifier.class file using a
hex editor.
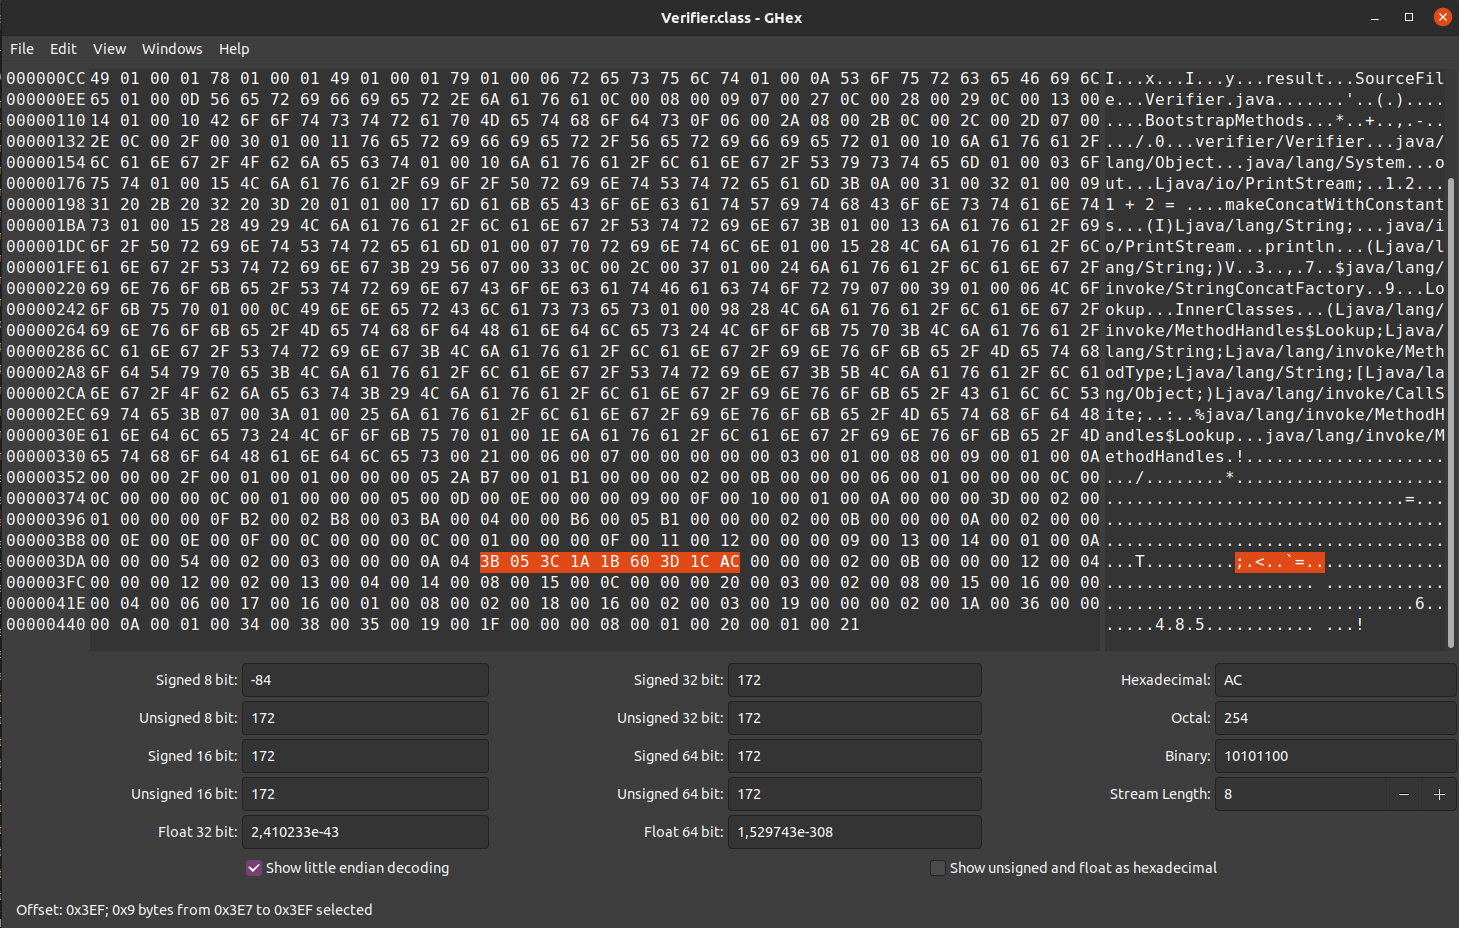
Verifier.class open in hex editor, calc function highlightedLets change 3C to 3B, thus not initializing variable y. If we now try to run the program we get the following error:
Error: Unable to initialize main class verifier.Verifier
Caused by: java.lang.VerifyError: Bad local variable type
1.1.3. Permissions
Another security mechanism that the JVM has is the security manager. The security manager controls whether a specific operation is permitted or not.
Operations checked by the security manager include:
-
Creating a new class loader
-
Exiting the virtual machine
-
Accessing a file
-
Opening a socket
For a complete look of default permissions that are available have a look at the javadoc.
By default Java runs without a security manager installed. This means that by default all operations are permitted.
You can set a Security Manager with the following code
System.setSecurityManager(new SecurityManager());However without specifying permissions somewhere the Security Manager is quite useless. To fix this we can specify security policies in a so called security policy file. There are a couple of ways to let the Security Manager know about the policy file(s).
-
The
java.policyfile in the Java platform’s home directory -
The
.java.policyfile in the user’s home directory -
By setting the
java.security.policyproperty
System.setProperty("java.security.policy", "<path_to_policy>/security.policy"); -
By starting the JVM with the
java.security.policyargument
java -Djava.security.policy==<path_to_policy>/security.policy Application
The policy file contains a sequence of grant entries, where each entry has the following form:
grant codesource
{
    permission1;
    permission2;
}
For example if we want our application to be able to read and write a file
called test.txt in the user’s home directory and be able to read all
the files in the log directory, we could do that as follows:
grant
{
    permission java.io.FilePermission "${user.home}/test.txt", "read, write";
    permission java.io.FilePermission "${user.home}/logs/*", "read";
};
Now if the application tries to open a different file, the security manager will trow a exception
java.security.AccessControlException: access denied ("java.io.FilePermission" "<path_to_file>/test2.txt" "read")1.2. Web application
During PRC1, PRC2, PRJ1 and PRJ2 we have seen a lot of concepts that apply to all kinds of different programming languages. To show some common security pitfalls we have developed a simple, but insecure web application.
The web application is build in Java and is using Javalin to set-up a simple web framework.
Structure of the application
public class App {

    public static void main(String[] args) {
        Javalin app = Javalin.create(config -> {
            // Add static files (images, html, css, javascript)
            config.addStaticFiles("public");
        });
        // Start at port 8080
        app.start(8080);

        // Use database helper from PRC2 to get a datasource
        final var db = DBHelper.getDataSource("jdbc.pg");

        app.post("/login", ctx -> {
            // Convert JSON data to Login (username, password)
            var data = ctx.bodyAsClass(Login.class);

            // Get a database connection
            var connection = db.getConnection();
            // Create a statement
            var statement = connection.createStatement();

            // Build query to check if the username exists with the given password
            var query = "select username from users where username = '"
            + data.getUsername() + "' and password = '" + data.getPassword() + "'";

            try{
                // Execute the query
                var rs = statement.executeQuery(query);
                // Check if user with password exists
                if(rs.next()){
                    ctx.status(200);
                    // Return the username
                    ctx.json(rs.getString("username"));
                }else{
                    // User doesn't exist, return error message
                    ctx.status(401);
                    ctx.result("The combination of username/password is not known.");
                }
            }catch(PSQLException ex){
                // Somethin went wrong with the query
                ctx.status(500);
                ctx.result(ex.getMessage());
            }
        });
    }
}CREATE TABLE prc2.users(
id SERIAL PRIMARY KEY,
username TEXT,
password TEXT
);Make sure to populate the table if you want to follow the examples.
For the example we will be using the user testuser.
<!DOCTYPE html>
<html lang="en">
<head>
    <meta charset="utf-8">
    <meta name="viewport" content="width=device-width, initial-scale=1, shrink-to-fit=no">
    <title>Login</title>
    <link rel="stylesheet" href="css/style.css">
</head>

<body>
    <div class="container">
        <div class="login">
            <form id="login" method="POST" action="login">
                <div class="form-title">
                    Login
                </div>
                <div class="form-row">
                    <label for="username" class="hidden">Username</label>
                    <input type="text" id="username" name="username" placeholder="username">
                </div>
                <div class="form-row">
                    <label for="password" class="hidden">Password</label>
                    <input type="password" id="password" name="password" placeholder="password">
                </div>
                <div class="form-row errors hidden">

                </div>
                <div class="form-actions">
                    <button class="btn full-width" type="submit">Login</button>
                </div>
            </form>
        </div>
    </div>
</body>

<script src="js/form.js"></script>

</html>const loginForm = document.querySelector("form#login");
const errors = document.querySelector(".errors");
const submit = (event) => {
// Stop the event
event.preventDefault();
// Retrieve the values
const form = new FormData(event.target);
// Create new object from form entries
const data = Object.fromEntries(form.entries());
login(data);
}
const setup = () => {
// Check that login form exists
if(!loginForm){
console.error("Login form not found");
return;
}
// Add form submit handler
loginForm.addEventListener("submit", submit);
};
const showErrors = (error) => {
if(!errors){
return;
}
errors.innerHTML = error.message;
errors.classList.remove("hidden");
};
const removeErrors = () => {
if(!errors){
return;
}
errors.innerHTML = "";
errors.classList.add("hidden")
}
const login = async (data) => {
// Clean up old errors
removeErrors();
try{
const message = await loginFetch(data);
window.alert(`Welcome back ${message}`);
}catch(error){
showErrors(error);
}
}
const loginFetch = async (data) => {
const response = await fetch("login", {
method: "POST",
headers: { "Content-Type": "application/json" },
body: JSON.stringify(data)
});
if(!response.ok){
throw new Error(await response.text());
}
return await response.json();
}
setup();1.2.1. SQL injection
In the images below we can see the normal usage of the web app. On the left we have successful login and on the right a unsuccessful.
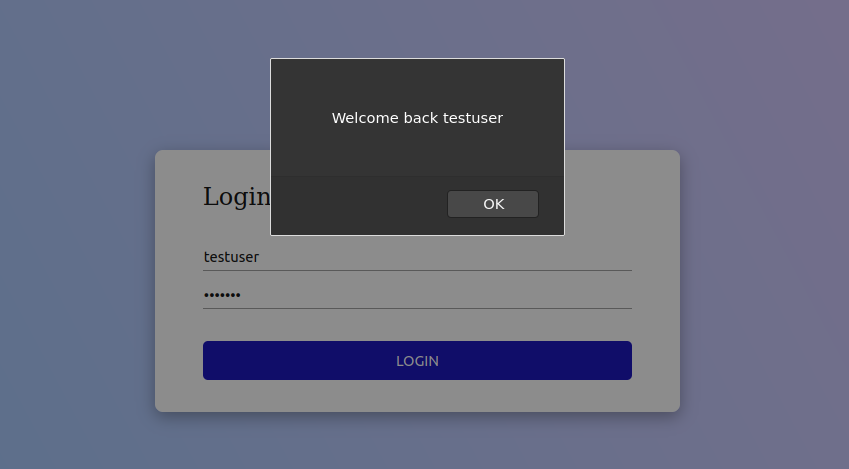
testuser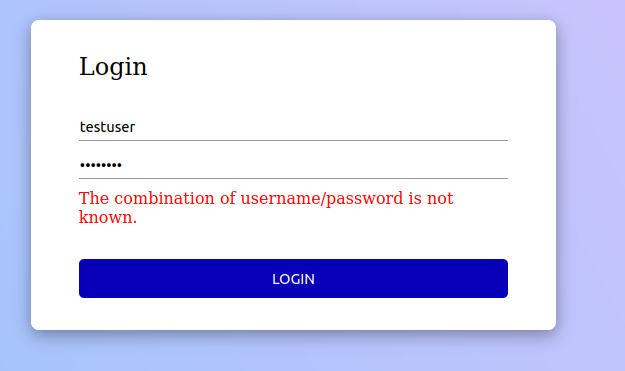
We can check if this form is susceptible for SQL injection by adding different
quotes and other characters that are used inside SQL.
For example input a single quote ' anywhere in the username
or password field. We get an error back telling us that the string
is unterminated
Unterminated string literal started at position 72 in SQL select username from users where username = 'testuser'' and password = ''. Expected charNotice the useful error message, we will get back to this in the section error handling.
For now lets focus on the unterminated string, this means that there is a SQL injection possibility.
So lets try to login as testuser without knowing the password.
We can do this by entering the username testuser and for the password
we need to enter something that is always true.
' or '1' = '1Now we can login as any user as long as we know the username.
But how can we retrieve the password for a given user?
We can use a UNION SQL statement to retrieve data and union it with
the selected username.
Using the following query we retrieve the password for testuser
' UNION SELECT password FROM users WHERE username='testuserWe can even retrieve a combination of users and their given passwords with the following query:
' UNION SELECT CONCAT(username, ' : ', password) FROM users OFFSET 1 -- --'-
CONCAT: Concatenate the username and password
-
OFFSET: By changing the offset we can enumerate the complete users table
-
— --: SQL comment used to drop the rest of the query
If the database is not correctly configured we can even enumerate the complete database and retrieve data from other databases/schemas/tables.
For example if the current database and schema would contain a table secrets
that has one column named secret we could retrieve the secrets as follows:
' union select table_schema from information_schema.tables where table_name = 'users'-- --  (1)
' union select table_name from information_schema.tables where table_schema='public'-- --   (2)
' union select column_name from information_schema.columns where table_name='secrets'-- --  (3)
' union select secret from secrets-- -- (4)| 1 | Get the schema for the current table → return public |
| 2 | Get all the tables for the current schema → shows that a table named secrets exists |
| 3 | Get all the columns for table secrets → returns secret |
| 4 | Get the secret |
1.2.2. Database management
The reason that the in the previous section we were able to retrieve
the secret was because the application logs in under the user postgres.
This postgres user is a superuser, which means it can do everything.
The application for now only needs read access to the users table, so lets
create a new user and only give it the select right on the table users.
CREATE ROLE app LOGIN;          (1)
GRANT SELECT ON users TO app; (2)| 1 | Create a role (user) called app and give it login rights |
| 2 | Give the role app select rights on the user table |
If we now try to run a SQL injection using the secrets table again
we are met with the following error message:
ERROR: permission denied for table secretsAnd if we try to to find out what other tables there are in the
public schema, we will only find the users table.
We added access control at a table level, however it is also
possible to this on different levels.
You can grant permissions on a database level, schema level, table
level, and column level using the
grant permission.
It’s even possible to add access control on a row level using
policies.
It’s also possible to create a group role such that a user can belong
to a group and inherit all the rights of that group.
This is of course only a step in the right direction, there are more steps that can be taken to harden your database (depending on your needs):
-
Disable login (only local over unix socket)
-
Only login in from localhost or specific IP
-
Login using certificates instead of password
-
Enable logging
-
Enable TLS
1.2.3. Password management
While doing the SQL injection attacks we were able to retrieve the passwords in plain text. This is of course a complete no-go in term of security.
So how to do password management the right way?
The best way is to not store a password at all. This might sound a bit
weird, but you probably use or at least have seen the login in with
(Google, Apple, Github, etc.) buttons on websites.
This way of loggin in uses the OAUTH (2.0) protocol.
Using this protocol the client will retrieve an access token from
the Authorization server that can then be used on the Resource server.
So the application will never receive the user’s password.
If you can’t or don’t want to provide OAUTH 2.0 login functionality, it’s best to not roll your own implementation for storing passwords (nor for authentication/authorization). So if possible use the functionality of the framework you are using. If you are not using a framework or the framework doesn’t offer this functionality, see if there is a reputable library that can do the work for you.
Finally if you have to store your password manually, make sure to use current best practices.
First of all the password should be hashed using a cryptographic hash function. A cryptographic hash function has the following properties:
-
One way: it’s not possible to compute the original text from the hash
-
Deterministic: the same text will always produce the same hash
-
Diffusion: changin just one bit, should change the hash significantly
-
Collision resistance: It’s not feasible to find two passwords that both have the same hash
-
Fast: the hashing algorithm should be fast
Let’s have a look at the sha256 hash of a text and what happens if we slightly change the text (adding a '.' at the end).
Text:   This is a test string to hash
Sha256: f70b476ff948472f8e4e52793a5a2779e636c20dd5336d3a8a4455374318db35
Text:   This is a test string to hash.
Sha256: 862a9e0d0890a7a28e27c558c80820a0db36eea02e51e2dee8094deade308319
However just storing the hash in the database instead of the
password is still not safe. This is because of the deterministic property of hashing.
An attacker
can pre-compute a large table of hashes for common passwords and easily
check if the hashed password matches a known hash from the table.
To combat this a salt is used. A salt is a large random, non-secret
that can be stored with the password hash. The salt is added to the
hashing process to produce unique hashes even if users have the same or a
common password.
| Password | Salt | String to be hashed | Sha256 hash |
|---|---|---|---|
secret |
DWEFAVLJQFEOHSZG |
secretDWEFAVLJQFEOHSZG |
7ddc02be0b03aef77cc7298083aabc2417fac820263ecfc0f799876fc04c7d30 |
secret |
OJYKWXMKWYXNTTUW |
secretOJYKWXMKWYXNTTUW |
f8da88f1240307b1441bcdfe0ba1c9d9bc0c6113dbfaa8fc869f3a6f42b5dba7 |
The last problem comes from the fast property of normal hashes.
You want to make it hard for an attacker to bruteforce retrieved hashes.
To do this you intentionally make the hashing algorithm slower, especially
you make it slower to do on GPUs as these are used in the bruteforce process.
This leaves us with a couple of recommended hashing algorithms:
-
bcrypt
-
algon2(id)
-
scrypt
-
PBKDF2
1.2.4. Transport layer security
When you start the web applicatio by default it will run over HTTP. Running a website (or other service) over HTTP has two major problems.
The first problem is that the traffic between the client and the server is not encrypted. In theory everyone can see all the traffic between you and the server.
We will use Wireshark to show how we can see traffic to and from our application.
First start the web application, it will be available on
localhost:8080 by default. (You can also start another server
e.g. python3 -m http.server 8080).
Secondly start wireshark and select the right interface to capture
traffic on.
If you are on linux or Mac you can use the loopback
interface to capture traffic on localhost.
Otherwise capture traffic on your main interface. Find out the
local ip address of your device: ipconfig. And now use another
device to connect to the server, e.g. if you local ip address
is 10.0.0.1, then enter 10.0.0.1:8080 in the browser.
You should now be able to see traffic from and to the server
in Wireshark. When you try to login you should see a POST
request to /login, see the image below.

Right click the request > Follow > TCP Stream will show the complete TCP stream (request and answer) as shown below. You can clearly see the username and password in the request.

The second major problem with running a service over HTTP is
that there is no way to verify that the server is who it claims
to be. Nor that the traffic from the server is actually (unmodified)
traffic from the server.
If connected to a public WIFI the owner of the WIFI can change
the messages to and from the server to anything they like
and there is no way of knowing.
Not just on public WIFI but also on trusted networks are
there ways to do a Man-in-the-middle (MITM) attack and
intercept and change HTTP traffic.
The solution to both these problems if to use HTTPS.
-
Certificate: by using HTTPS the server provides a certificate that is signed by and Certificate Authority (CA) to prove that the server is who it claims to be.
-
Encryption: the server certificate is used to generate a session key, which is used to encrypt all traffic to and from the server.
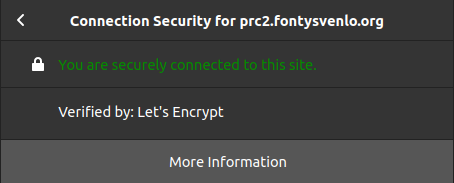
Nowadays it is really easy and free to get a certificate for a public facing server by using Let’s encrypt.
It’s even possible to create your own CA to sign certificates
on your local network. You can do this by using
tools such as openssl, the Java keytool or use a tool such as mkcert that
streamlines the process for you.

1.2.5. Error handling
Showing errors in the front-end can be very helpful,
especially during development.
However these errors also pose a security risk as it
can help attackers better understand the system.
In our vulnerable web application we have already seen a very big security risk where the SQL exception gets displayed on the front-end, thereby given attackers access to the complete query that gets executed.
But error handling can also be a bit more subtle.
In the following example the web application will
return a Username not found when the account does
not exist and a Wrong password. when it does exist,
but a wrong password is entered. From a user perspective
this is of course very nice, you know that you either
entered the wrong username or the wrong password.
if(username == null){
    return "Username not found."
}else if(password == null){
    return "Wrong password."
}
However an attacker can use this functionality to check
which usernames exist, by means of the returned error
message. They may try to find an admin account and try
to guess/brute-force the password for that account.
To combat such an attack it is better to return a less
descriptive error message, such as Username or password incorrect.
This way an attacker can not tell if the username exists
or that the password is wrong.