1. Java Platform Module System.
The Java Platform Module System has been introduced with Java 9 and had a long development history at the point of introduction. For the Java developers at Oracle and others involved in the OpenJDK project it was considered a necessary step to make Java fit for the future and make it possible to shed some old nasty problems. In the development of Java there have been only a few major release, although each release of Java introduces new features that are supposed to play nice with what is already available. This is called forward and backward compatibility, so old programs keep working but can be maintained by using new features.
The important major releases were:
-
Java 1. Duh.
-
Java 1.2 introducing the collection framework.
-
Java 5 introduces Generics and the first version of the concurrency framework. It also changed the naming scheme. Internally it still is Java 1.5.
-
Java 8 introduced a functional style of programming using Functional interfaces and lambda expressions
-
Java 9 introduced the Java Platform Module System, and the project under which it came into being was called JigSaw.
That last name points to the idea of taking the JDK and run-time library apart and recompose it using a better partitioning, actually applying separation of concerns in a big way. The project has been a multi year undertaking.
The changes provide the following advantages for the Java platform developers (from project jigsaw)
-
Make it easier for developers to construct and maintain libraries and large applications;
-
Improve the security and maintainability of Java SE Platform Implementations in general, and the JDK in particular;
-
Enable improved application performance; and
-
Enable the Java SE Platform, and the JDK, to scale down for use in small computing devices and dense cloud deployments.
As always with Java, the intent is that the new Java release (9) should be able to work very much the same as the earlier versions, and it does, without problems. If you use the JVM and JDK in classpath mode, it works very much like older versions. You define the jar files you need for you app and off you go.
Although the intent always has been to make the transition as smooth as possible, when you want to use the module system to the fullest, it has some consequences.
-
Not everything in the JDK can be used in the same way as before, more protection is taking place as are checks.
-
A module is closed by default and must explicitly export packages, if they are needed from outside the module.
-
The classes in a module can’t be reflected on by default. If that is needed, the package must be made opened for reflection.
-
At the moment of writing these restrictions can be modified with startup flags of the JVM. Later Java releases may change the default settings, from rather permissive in Java 9 to more restricted in later releases. As an example, some settings became more strict with Java 16 and JEP 396 Strongly Encapsulate JDK Internals by Default.

Having a modular project or a non-modular project depends on the presence of a small file with a well defined name in a specific place.
The module-info.java file should reside in the root folder of the java sources (which makes the defaul package). The name of the file is not a valid java type name and that is on purpose. The resulting class file contains the module declarations which specifies what a module needs (reads in JPMS terms) and what it provides (exports).
The keywords specific to the module declaration are
-
exports What the module provides. Use with one package per line.
-
module starts the declaration
-
open if before the module, opens the whole module for reflection. For instance for a module that defines all entities of a multi-module application.
-
opens allows reflection of a package. Use with one per package per line.
-
provides To indicate that a module implements some interface with one or more implementations.
-
requires Indicates what the module itself needs or reads. One package per line.
-
transitive Used with requires to indicate that there is a requirement that is then made readable to the users of this module as well.
-
to Used to restrict either exports or opens to specific other module(s).
-
uses To indicate that a module uses a service provided by another module.
-
with Used with provides to indicate which implementation(s) are available for the provided interface implementation. See the Service Loader API.
As a rule, the module java.base is 'required' by default, the same as java.lang is available or imported by default, considering packages to import.
A few examples.
module  io.github.sebivenlo.genericmapper {
    requires java.logging;
    requires io.github.sebivenlo.sebiannotations;
    exports genericmapper;
}module io.github.sebivenlo.genericdao {
requires io.github.sebivenlo.genericmapper;
requires java.logging;
requires java.sql;
requires java.naming;
requires org.postgresql.jdbc;
requires io.github.sebivenlo.sebiannotations;
exports genericdao.dao;
exports genericdao.memory;
exports genericdao.pgdao;
}module fxtriangulate {
requires javafx.controls;
requires javafx.graphics;
requires javafx.base;
requires javafx.fxml;
requires java.base;
exports fxtriangulate ;
opens fxtriangulate to javafx.fxml;
}module surveyor {
requires java.logging;
requires javafx.controls;
requires javafx.graphics;
requires javafx.base;
requires javafx.fxml;
requires fxtriangulate;
exports surveyor;
opens surveyor to javafx.fxml;
}module sortingserviceapi {
exports sortingservice; (1)
}
// and
open module asortingservice {
requires java.logging;
requires sortingserviceapi;
uses sortingservice.SortingServiceFactory; (2)
provides sortingservice.SortingServiceFactory with asortingservice.SortingServices; (3)
}| 1 | defines sortingservice.SortingServiceFactory in package sortingservice |
| 2 | uses and |
| 3 | provides Sorting Services presumably in tests. |
|
JPMS explicitely forbids:
|
The dependencies are validated at the startup of the JVM, when you start Java. If any of the requirements is not met, the JVM refuses to start. This has the benefit that it is immediately obvious what is missing, instead of having a runtime error, when a class can’t be found, because the module has not been specified in the path, as is the case with the classpath mode.
The split package has been a bit of an issue for testing, because in a modern project, (business) source and tests are separated into separate source trees, often with the same package structure, which looks a bit like split packages. The build tools (e.g. maven) understand this and can organise the files such that the JVM accepts it anyway.
1.1. Changes in visibility
Java has always had the visibility modifiers public, protected, default, and private, in descending order of access.
This is still effective with the same rules within a module. However the module boundaries add an extra line of visibility defense.
A public element from module A is only visible to elements in module B if the public elements is part of an exported package.
As far as reflection goes. An element in module A is accessible via reflection only if the package of the element is open (with the opens keyword)
either globally or explicitly to module B ( e.g. module A { opens aPackage to B;}).
2. Java Modules and Testing
 Project Jigsaw,
now known as the Java Platform Module System solves problems
that lingered in the Java ecosystem since its inception. The standard encapsulation or visibility model
with protection or visibility modes
Project Jigsaw,
now known as the Java Platform Module System solves problems
that lingered in the Java ecosystem since its inception. The standard encapsulation or visibility model
with protection or visibility modes private, package private (default) provide too
little defense against (ab)use of non-public API’s. That plus the fact that reflection is very powerful.
A java security manager can put up some defense against reflection abuse, but enabling this kind of security is optional.[1]
This made many internal details of the JDK free game. Much like a knight in shiny armor is defenseless against a can opener.
|
The java platform module system (JPMS) promotes loose coupling. |
This is all fine and good, but testing, in particular Unit testing relies on access to the 'private' parts of a class and package, in particular the package private parts.
|
API or Application Programming Interface is defined as the publicly visible parts of classes. In Java those are public and protected members (methods and fields). Members that are neither public or protected should not be considered part of the API. Actually, API in this case should be spelled APPI for Application Public Programming Interface, but we all know bad habits die slowly. A smaller API has also a smaller attack surface for real security intrusions. This is another major reason for improved encapsulation of the stuff in the JDK. To minimize coupling, it is also wise to keep the API minimal, but without impairing the usefulness of the API. Often an API can be enhanced with some convenience features that combine parts in the already public part. This does NOT enlarge exposed parts. See for instance the methods in java.nio.file.Files. |
2.1. Black box vs White Box
In testing, one distinguishes between so called black box and white box tests.
Black box in this respect means that you cannot see the internals, but only those parts defined in the API.
This is the way that a client package will use the API. Black box testing is easily supported by the module system, because the test classes behave as ordinary
clients.
White box would better be called transparent box, but the name white box stuck. In white box tests you DO want access to the (package) private parts
of your business code. This is a bit handicapped by the way the JPMS allows access.
2.2. Standard Source code organization.
src
└── main
    ├── java
        ├── module-info.java (1)
        └── genericdao
            ├── dao
            ├── memory
└── pgdao| 1 | module-info.java at the root of the java sources. |
We are using maven, in which the unit test plugin is called surefire, the integration test plugin (which we did not use up to this point yet) is called failsafe.
The standard way source code is organized is by means of separate directories for
the 'business' code and the test code in two separate directory trees inside the same project.
This practice, which prevents test code to land in the final application or library jar file is useful, so we will keep it as it is.
However, JPMS does not allow so called split packages. Surefire addresses this problem by telling
the JVM to patch the module we are testing with the classes defined in the test source tree.
It is as if the test classes are put in the business source tree.
This allows the test classes access to the package private parts of the classes, the way it worked in before JPMS.
module nl.fontys.sebidao {
    exports io.github.sebivenlo.dao;
    exports io.github.sebivenlo.dao.memory;
    exports io.github.sebivenlo.dao.pg;
    requires java.logging;
    requires java.naming;
    requires java.sql;
    requires org.postgresql.jdbc;
}
The module definition above exports three packages and declares itself dependent on 3 modules from Java API and one postgresql module.
Unit tests, and in particular the testing libraries such as AssertJ, and Mockito use reflection to do their work. The simplest example is JUnit itself, which uses reflection to read the annotations in the class file. So does Mockito. AssertJ uses reflection to get to fields (for deepEquals) and methods. Reflection is a tool very sharp indeed, to get to the guts of the System Under Test. Of these Test libraries JUnit and AssertJ have module definitions already. Mockito and postgresql do not have that at the time of writing this document (April 2020).
The quickest way to allow the testing tools access is to fully OPEN the packages of the SUT to world. Because this happens during testing, surefire is instructed to tell the jvm (java), that runs the test, to open those packages to the world. The snippet from the maven pom file that realizes that is given below. You can copy and adapt it for your own purposes.
  <properties>
    <surefire.opens> (1)
        --add-opens io.github.sebivenlo.genericdao/genericdao.dao=ALL-UNNAMED (2)
        --add-opens io.github.sebivenlo.genericdao/genericdao.memory=ALL-UNNAMED
        --add-opens io.github.sebivenlo.genericdao/genericdao.pgdao=ALL-UNNAMED
        --add-opens io.github.sebivenlo.genericdao/usertypes=ALL-UNNAMED
        --add-opens io.github.sebivenlo.genericdao/entities=ALL-UNNAMED,genericmapper
    </surefire.opens>
    (3)
</properties>| 1 | We are adding a property for the surefire plugin which is picked up by testeasypom. |
| 2 | In particular the arguments that are passed to the JVM that runs the tests, which appends --add-opens commands for all packages that require unit tests. |
| 3 | Other properties are left out for brevity. |
| The above requires testeasypom version 3.0.2 or higher as parent for your project. Also works if the parent of your modular maven project uses testeasypom as parent. |
Of particular importance, and project specific are the --add-opens commands, which you must adapt to your own project’s
pom file with your own module and package names.

Opens is the most powerful way of exporting a package. It allows full access (as in exports) plus reflection.
We could try to make more specific export lines such as --add-export, but although more precise, that will not help very much, because the
access enabling lines will only take effect during the (surefire) unit tests.
If you have failsafe integration tests, you will have to do
the same for the failsafe plugin, although failsafe tests should stick to black box testing, where such can opener style configuration should not be required.
3. Java FX Bindings
The graphic style of JavaFX is already quite nice. The architecture of JavaFX applied the lessons learned from the earlier Java framework AWT and Swing.
|
Swing and AWT are the Java GUI
frameworks with which NetBeans IDE and Intelij is built.
That proves that these framworks are still in use in the industry. There is another Java GUI framework word mentioning, which is SWT, developed by IBM under the Eclipse flag. You may be familiar with the style if you have used for instance DBeaver. |
One of the other important innovations are the JavaFX bindings. They provide an elegant way to distribute dynamic information throughout a GUI application, and help separating business and GUI code.
The concept of bindings relies on the Observer Pattern, which says that a change producing instance can inform an interested party about a change that happenend.
The classic observer pattern informs all of its Observers, or Listeners immediately of and change. The JavaFX approach is to relax a bit and take the Lazy approach. Being lazy is good, because avoiding work that is (not yet) needed is a way to reduce work and in the end speed up an application.
 The idea is to only invalidate a value when a change happens, and only start the computation when some one
actually needs the result, for instance the GUI layer that needs to do a redraw.
The idea is to only invalidate a value when a change happens, and only start the computation when some one
actually needs the result, for instance the GUI layer that needs to do a redraw.
Since Observables can be chained, changing one value may trigger a whole avalanche of computations.
In JavaFx, it is still an avalanche, but of invalidations, and no computations. The computation is only done
when some one needs the result.
JavaFX defines so called Properties in the javafx.beans package and its sub-packages javafx.beans.properties and javafx.beans.bindings.
The Oracle tutorial by Scott Hommel sheds some light on the matter.
The Bindings and Properties packages provide several ways to create bindings, including expressions of various types, with specialized properties for int, long, and double as the most important specializations.
3.1. Binding APIs
    IntegerProperty num1 = new SimpleIntegerProperty( 1 );
IntegerProperty num2 = new SimpleIntegerProperty( 2 ); NumberBinding sum = num1.add( num2 ); (1)
System.out.println( sum.getValue() );
num1.set(2); (2)
int result= sum.getValue(); (3)
System.out.println( result );| 1 | Creates the binding but does NOT compute anything |
| 2 | Set the value, and invalidates the value, so observers must recalculate. |
| 3 | The get is the observer’s action that actually triggers the actual computation. |
    NumberBinding sum = Bindings.add(num1,num2); (1)
    System.out.println(sum.getValue());
    num1.setValue(2);                            (2)
    int result= sum.getValue();                  (3)
System.err.println( result );| 1 | Creates the binding but does NOT compute anything |
| 2 | Set the value, and invalidates the value, so observers must recalculate. |
| 3 | The get is the observer’s action that actually triggers the actual computation. |
    IntegerBinding sum( IntegerProperty n1, IntegerProperty n2 ) {
        return new IntegerBinding() {      (1)

            {                              (2)
                super.bind( n1, n2 );
            }

            @Override
            protected int computeValue() { (3)
                return n1.get()+n2.get();
            }
        };
}| 1 | Anonymous inner class with IntegerBinding as super class. |
| 2 | Anonymous 'constructor' that tells the binding what its dependencies are. |
| 3 | The computation, which can be arbitrarily complex, and is only executed if
some one ask the super for get(), which will then invoke computeValue(). Note the use of protected, so
this method is only callable from within the hierarchy between the IntegerBinding and its anonymous sub class.
computeValue is the only abstract method in abstract class IntegerBinding. |
|
Quite often, and certainly when dealing with a GUI, you need to translate the values of a binding into
its String representation. In this case toString() does NOT cut it. What you need is a StringBinding that is created from the Binding you want to show as text. That is what public StringBinding asString() in the Binding framework is for. |
3.2. Unbinding DoubleBinding dependencies
There are use cases where you have to unbind bindings. One such use case is the exercise FXTriangulate.
The DoubleBinding abstract class implements javafx.beans.binding.Binding, which states in its doc that the getDepencies() method should not be used
in production code. We therefor will us a simpler approach.
Since the protected# bind(…) and protected unbind() methods both take a varargs argument, which is an array in disguise,
the only thing you can do is to remember all bound bindings and
when you have to unbind one, unbind all and then rebind the remaining.
This appears the most reliable method.
The binding and unbinding is necessary to make the binding listen to its dependencies.
class ModifyableDoubleBinding extends DoubleBinding {

    Set<ObservableDoubleValue> values = new HashSet<>();

    @Override
    protected double computeValue() {
        double result = values.stream()
                .mapToDouble( ObservableDoubleValue::get ).sum();
        return result;
    }

    void add( ObservableDoubleValue v ) {
        unbind( values.toArray( ObservableDoubleValue[]::new ) ); (1)
        values.add( v );
        bind( values.toArray( ObservableDoubleValue[]::new ) );
        invalidate();
    }

    void remove( ObservableDoubleValue v ) {
        unbind( values.toArray( ObservableDoubleValue[]::new ) );
        values.remove( v );
        bind( values.toArray( ObservableDoubleValue[]::new ) );
        invalidate();
    }
}| 1 | Collection.toArray(IntFunction<T[]> generator) is a method introduced in Java 11. |
3.3. Caching bindings
Creating bindings is powerful but can still lead to a performance bottleneck. If you create bindings willy-nilly, it might very well be that the same computation is done at several places and in a GUI screen redraw at almost the same time (or at least the reason) too.
To mitigate that problem, it can be wise to cache a binding once it’s created, and serve out the same binding on each subsequent call. A binding can have many Listeners, and it will dutifully inform all of them with either an invalidation call or change event. The Bindings themselves cache the value of the (last) computation and serve that out until it is 'discarded' on an invalidate call.
| The secret sauce in many speed optimizations is avoiding work. Thereby you avoid burning CPU cycles. And burning them is useless when nobody really needs the result (yet). Being lazy is good, but it needs some extra work from the programmer. |
    DoubleBinding lengthBinding( Line aLine ) { (1)
        return lengthBindings
            .computeIfAbsent( aLine,
                l -> lengthBinding(
                      l.startXProperty(),
                      l.startYProperty(),
                      l.endXProperty(),
                      l.endYProperty()
                )
            );
}| 1 | We use the line object as key in the map |
A naive approach to caching is to inspect a value for null and then instantiate one value when it is. In this case, because both the creation of the cache entries and the retrieval of the vale take place on the event thread, this naive approach works.
If you want that thread safe, you could use the same map as above with a surrogate key, like a simple object named Object AREA_KEY = new Object();.
You then can rely on the thread-safety properties of
a ConcurrentMap
instead of using a 'normal' hash map.
   /**
    * Cache for area binding.
    */
   private DoubleBinding areaBinding = null;

   /**
    * Create a binding to compute the area with a triangle determined by side
    * lengths a, b and c. This method consults the cache and has the value computed
    *
    * @return the area binding
    */
   final DoubleBinding areaBinding() {
       if ( areaBinding == null ) {
           areaBinding = areaBinding( distanceBinding( redCircle, greenCircle ), (1)
                   distanceBinding( greenCircle, blueCircle ),
                   distanceBinding( blueCircle, redCircle ) );
       }
       return areaBinding;
   }
// method that creates the binding is left as an exercise| 1 | Compute the binding if not yet available. |
| The approach of inspecting a value for null and then instantiating a new object when null is NOT threadsafe. The approach works in this case, because it all happens on the event thread, on the same thread, so there will be no interfering threads. |
4. Using SceneBuilder
When using SceneBuilder the idea is that you design the scene using SceneBuilder, which effectively is a what you see is what you get FXML editor. The JavaFx, more specifically the FXML part builds the graphical components or even the complete UI from such FXML files.
You can have multiple FXML files per application, much like you can have many scenes in a move or stage play.
There are various demos on Scenebuilder on youtube.
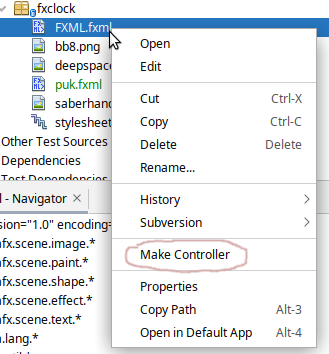 One of the most valuable tips from one of those videos is the fact that you can start with
scenebuilder and define your graphical components and methods in SceneBuilder and hence in the
fxml file and that then NetBeans IDE can generate or update the controller for you.
Working in this way can help you avoid typing or (different) spelling errors.
One of the most valuable tips from one of those videos is the fact that you can start with
scenebuilder and define your graphical components and methods in SceneBuilder and hence in the
fxml file and that then NetBeans IDE can generate or update the controller for you.
Working in this way can help you avoid typing or (different) spelling errors.
4.1. Defining Widgets using FXML
You can use FXML to define whole scenes for your application, but also to make your own specialized components. You can then layout them as you want and import them into SceneBuilder, where they behave like any other widget already available. This allows you to extend the available choices, and make special widgets that can play nicely with something like a game or a planning application.
When you want to define your own component, you have to make a few changes to the FXML file and have the component class load the FXML by itself.
<AnchorPane id="AnchorPane" fx:id="root" prefHeight="564.0" prefWidth="535.0" stylesheets="@stylesheet.css"
  >
</AnchorPane>fx:root. Example from FXTriangulator exercise.<fx:root type="javafx.scene.Group" xmlns="http://javafx.com/javafx/16" xmlns:fx="http://javafx.com/fxml/1">
<Circle fx:id="redCircle" centerX="10.0" centerY="10.0" fill="RED" radius="5.0" />
<Circle fx:id="greenCircle" centerX="400.0" centerY="10.0" fill="GREEN" radius="5.0" />
<Circle fx:id="blueCircle" centerX="10.0" centerY="400.0" fill="BLUE" radius="5.0" />
<Circle fx:id="centerCircle" fill="GREY" radius="5.0" />
<Line id="redLine" fx:id="redLine" endX="10.0" endY="400.0" startX="400.5" startY="9.5" stroke="RED" />
<Line id="greenLine" fx:id="greenLine" endX="10.0" endY="400.0" startX="10.0" startY="10.0" stroke="GREEN" />
<Line id="blueLine" fx:id="blueLine" endX="10.0" endY="10.0" startX="400.0" startY="10.0" stroke="BLUE" />
<Label fx:id="redLabel" text="a" />
<Label fx:id="greenLabel" text="b" />
<Label fx:id="blueLabel" text="c" />
<Label fx:id="areaLabel" text="" />
</fx:root>From the FXML file you can infer that the widget (in this case) is a specialized java.fx.Group. It can be any type that is a subclass of Parent (including Parent), if you want the widget to have sub-components.
Then in the Java file that is both controller and the subclass of the component you want to specialize, Group in the example.
public class Triangulator extends Group implements Initializable {

    @FXML
    Circle redCircle;
    @FXML
    Circle blueCircle;
    @FXML
    Circle greenCircle;


// stuff left out
    Triangulator( BindingBusiness bb ) {
        this.bb = bb;
        FXMLLoader fxmlLoader =
           new FXMLLoader( getClass().getResource( "triangulator.fxml" ) ); (1)

        connectLoader( fxmlLoader ); (2)

        try {
            fxmlLoader.load();
        } catch ( IOException exception ) {
            throw new RuntimeException( exception );
        }
    }

    final void connectLoader( FXMLLoader fxmlLoader ) { (3)
        fxmlLoader.setRoot( this );
        fxmlLoader.setController( this );
    }

// more stuff left out
}| 1 | Load the widgets fxml definitions. This will insert all @FXML annotated fields and would attach the actions to the @FXML annotated methods. |
| 2 | Connect this to the loaded FXML document. |
| 3 | Use a final or private method to set the root and controller of the loaded object to this, to avoid the warning of exposing this in the constructor. |
In the example widget we have three dots connected with lines. The dots are draggable, while the lines stay connected. The lengths can be computed using Bindings and are thus automatically updated, and are shown next to the lines.
We will use such a widget in the next example.
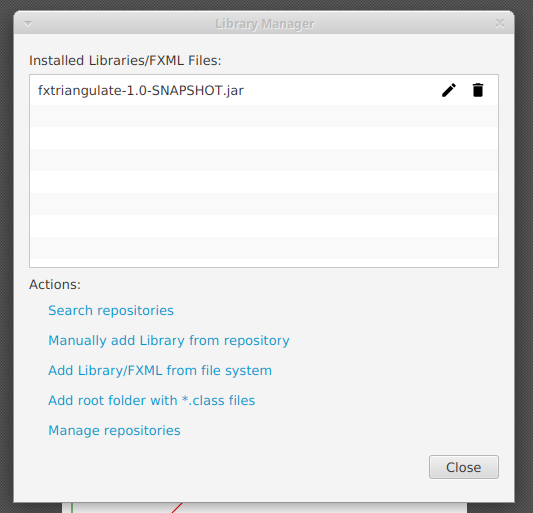
 Importing into scenebuilder is then done using the tiny cog next to the search text-field labeled Library. When you choose Jar/FXML Manager, you can add
widget libraries like you would with maven or point at a library on you machine.
Importing into scenebuilder is then done using the tiny cog next to the search text-field labeled Library. When you choose Jar/FXML Manager, you can add
widget libraries like you would with maven or point at a library on you machine.
FX Triangulation
The widget you will create is to do Polygon triangulation. It is an activity done by surveyor teams.
In the first part we will create a custom widget with its own controller and Java FX Node, in this particular case a Group
You will complete a GUI component or Widget that will be used in the SurveyorApp in the second part.
The advantages of developing a widget is a separate project are:
-
Potential reuse.
-
Separation of concerns.
-
Example of work separation. That what has been unit tested and coverage tested\ can be put as a separate task for a developer.
-
Didactic: show the use and impact of JPMS

Roles of the bindings
-
The corners of the triangle are represented as circles.
-
Length of leg The leg of a triangle is used to determine the distance between the corners.
when they coincide with the legs of a polygon, they measure the length of that leg. -
Midpoint of the lines are used in the GUI to position the attached length- and name labels of the triangle edges.
-
Center point or center of gravity of the triangle. Used to place the area label of the triangle.
-
Active lines To be able to measure the sum of lengths of the edges, some, but not all edges of the triangle are relevant.
Use of the Triangulator in the Surveyor App.
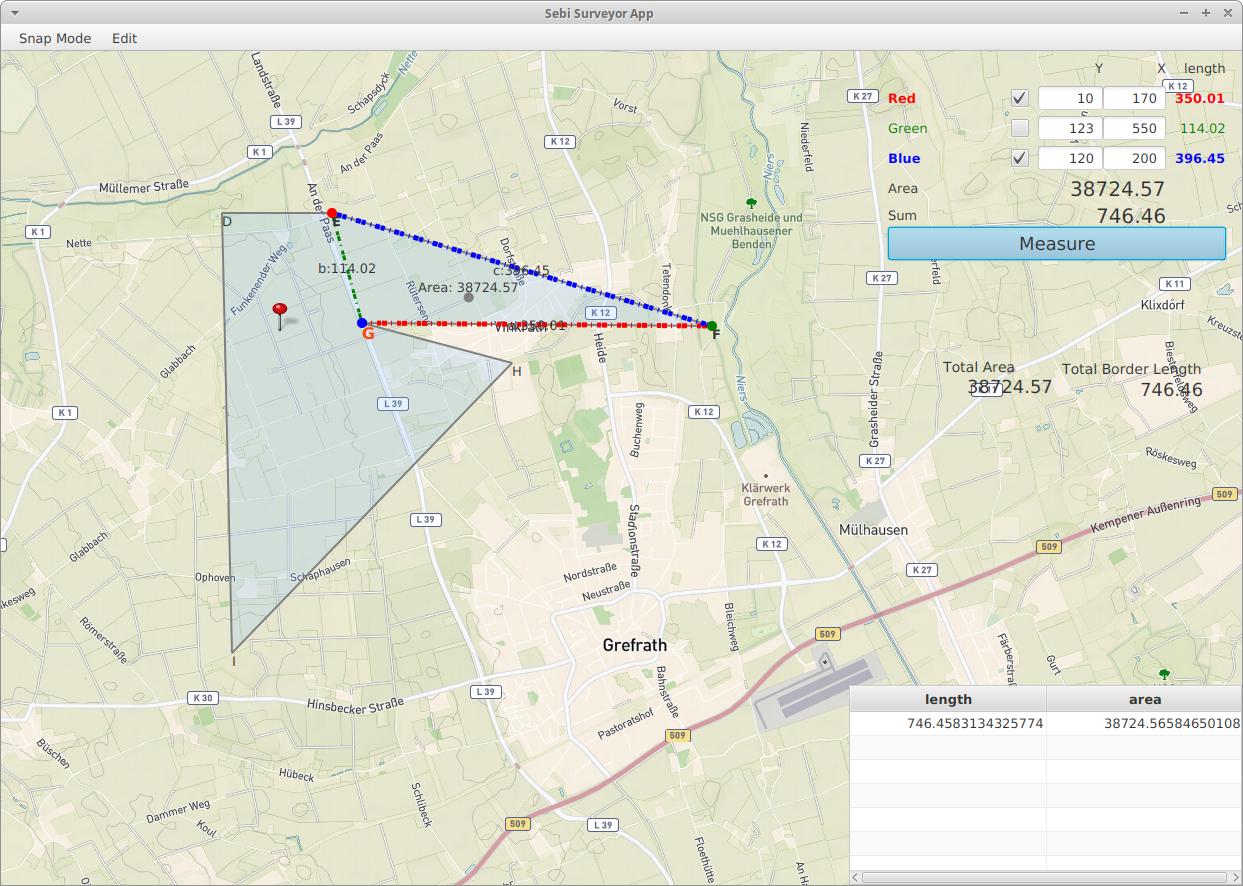
The Triangulator is a component that is used in the Surveyor App. You will find the app in your repository too, as an example to play with, but has no tests nor required business code for you to complete. See is as a code example of JPMS modular use and how a self created widget can be integrated in another project.
The requirements are more or less given by the (picture) of the UI and:
-
The user must be able to manipulate both the points of the triangle by dragging them with a mouse, and set the individual coordinates of the points in text fields.
-
The UI should show the area measured by the triangulator in a separate label.
-
Same for the lengths of the lines.
-
Since not all lines participate in the measurement of the border of a polygon, it should be able to specify which lines participate in the border length for a certain measurement.
-
It should be able to summarize as in sum up the results of the measurements, so as to determine both the total border length and the total area of a polygon.
-
The polygon must be visible and loadable in some way.
FX Triangulation

You will use JavaFX bindings to show the changing values of side lengths and area of a triangle. This is a tool that might be of use for surveyors. It uses the same mathematical computations to compute the enclosed area of a triangle.
A triangle is determined by three points, A, B, C. The sides are called a,b, and c, where a is opposite point A etc. A, a, B, b, C, and c, have the colours red, green, and blue.
The length of a side is determined by the formula of Pythagoras. \( l= \sqrt{(x_2-x_1)\times(x2-x1)+(y_2-y_1)\times(y_2-y_1)} \)
Let \(A_x,A_y\) be the coordinates for point \(A\), similar for \(B\) and \(C\).
The length \(a\) of the side opposite \(A\): \( a= \sqrt{(C_x-B_x)\times(C_x-B_x)+(C_y-B_y)\times(C_y-B_y)}\).
With this we can also compute side lengths \(b\) and \(c\).
With lengths a, b, and c the area of a triangle can be determined with Heron’s formula.
Let \(s = \frac{a+b+c}{2}\)
Then the area of the triangle is \(\text{Area}= \sqrt{s\times(s-a)\times(s-b)\times(s-c)}\).
The javadoc of the application and the test javadoc are available by following the links.
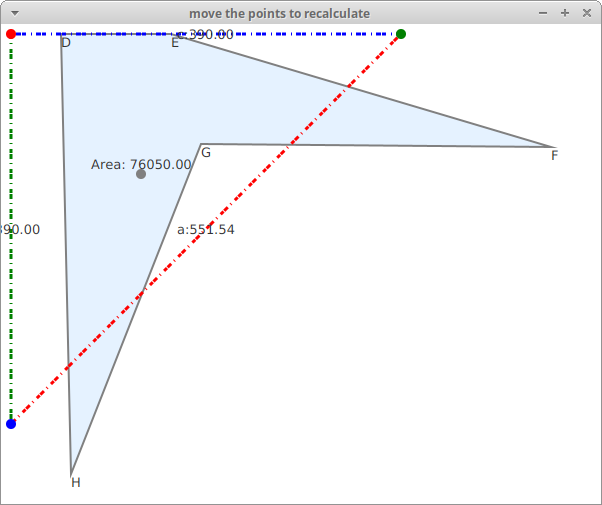
-
In the diagram you have three lines, red, green and blue, and three circles, also red, green and blue.
-
In all cases the circle is opposite the line of the same color.
-
The lines connect the circles of the other colors.
The triangulator supports the concept of active lines. An active line participates in the binding to find the total length of the circumference. When using the triangulator to survey an polygon shaped area, not all legs of the triangle should be used. The only exception is when the polygon to survey is itself a triangle. If a triangle leg coincides with one of the sides of the polygon, it can be used to measure the length of that side, but only once for each coincidence, to prevent double count.
You can find the test descriptions and the methods to be tested in the source code.
Look for the todo’s with CTRL+6 in NetBeans IDE.
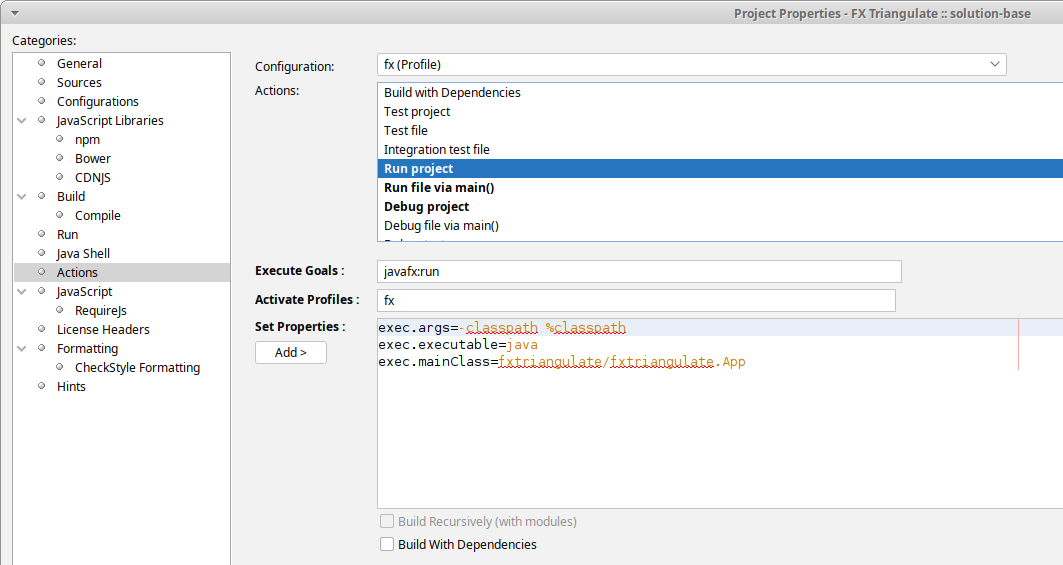
If you want to run the triangulator as a separate app, you may have to include a property in the pom.xml file that states what the main class is.
   <properties>
   ...
    <exec.mainClass>fxtriangulate.App</exec.mainClass>
   ...
   </properties>
To start it from the command line you can use a script that creates a jpms image and runs the jvm from there.
#!/bin/bash

if [ ! -f target/fxtriangulate/bin/java ]; then
    mvn -P fx -Dexec.mainClass=fxtriangulate.App javafx:jlink (1)
fi

## run the java version in the fxtriangulate image.
target/fxtriangulate/bin/java -m fxtriangulate/fxtriangulate.App (2)| 1 | Build an java image. |
| 2 | Run the app from the image directory. |
@echo off
set java=target/fxtriangulate/bin/java
if not exist %java% call mvn -P fx -Dexec.mainClass=fxtriangulate.App javafx:jlink
echo.
target/fxtriangulate/bin/java -m fxtriangulate/fxtriangulate.App|
If one of the givens tests. in particular GUITests.tLength fails on your machine, it may have to do with the locale of your machine. In week 10 we provide a solution for that exact problem. We have put it there because it belongs to the topics of that week. |
When running the scripts in the above example, the file target/fxtriangulate.zip contains a complete image for the application. You should be able to deploy it on another machine with the same architecture. Because the image brings along its own java virtual machine and libraries, you do not have to have java installed on the target machine. This way of deployment is very similar to what you see in app stores on mobile devices. The app brings along its complete set of required dependencies and resources. The advantages are easy deployment. The disadvantage is big images, which take up a lot of space. But that appears to be a minor problem nowadays. And since the image created by jlink contains only the required parts of the JDK and not all of it, there is a gain in using jlink as a path to deployment.
The trimming down of the image is one of the features made possible by the Java Platform Module System.
5. Testing Scene Switching
It may look like a black art, but isn’t. Again it is cooking with water. It gets a bit harder when you want (and we insist) to throw a bit of testing into the mix. What may trouble the waters a bit is that testing is typically blatantly ignored by the examples, including the ones created by your IDE. Let us fix that.
5.1. Use case: application with multiple "scenes".
In many applications you want to be able to change from one fx scene, typically a form of sorts, to another one. You can do that relatively easy, by following the examples generated. Testing the switching is never considered in the examples, so we must repair that.
Because we want to work test driven, we start with the test.
|
We are not switching the Scene but actually the root of the Scene. But SceneSwitching says more about the purpose, not how it is done. So much for naming. |
    @Start
    void start( Stage stage ) throws IOException {
        app = new Switcher(); (1)
        app.start( stage );
        this.stage = stage;
    }

//    @Disabled("think TDD")
    @Test
    public void tSwitch() {
        Parent root = stage.getScene().getRoot();
        printChildren( root );
        app.setRoot( "secondary" );
        FxRobot rob = new FxRobot();
        rob.clickOn( "#cb1" ); (1)
        Button b = (Button) rob.lookup( "#secondaryButton" ).query(); (2)
        rob.clickOn( b ); (3)
        pause( 1000 );  (4)
        b = (Button) rob.lookup( "#tertiaryButton" ).query();
        rob.clickOn( "#cb1" );
        rob.clickOn( b );
        pause( 1000 );
        assertThat( stage.getScene().getRoot().getId() ).isEqualTo( "secondary" );

//        fail( "method method reached end. You know what to do." );
}| 1 | Do a "business" operation. |
| 2 | Select button and |
| 3 | press it to make scene switching work. |
| 4 | Give the human a break, so that he/she can convince (her|him) self. |
For UI test, and for FX test in particular, you need some setup.
    static {
        if ( Boolean.getBoolean( "SERVER" ) ) {
            System.setProperty( "java.awt.headless", "true" );
            System.setProperty( "testfx.robot", "glass" );
            System.setProperty( "testfx.headless", "true" );
            System.setProperty( "prism.order", "sw" );
            System.setProperty( "prism.text", "t2k" );
            System.setProperty( "glass.platform", "Monocle" );
            System.setProperty( "monocle.platform", "Headless" );
} @Start
void start( Stage stage ) throws IOException {
app = new Switcher(); (1)
app.start( stage );
this.stage = stage;
}| 1 | Note that the start method actually gets the complete switcher app. |
To make this work not only for a trivial demo, we threw in a factory pattern, the odd Lambda, and a few maps for good measure.
public class PrimaryController implements Initializable, FXUIScraper {

    final RootSwitcher switcher;

    @FXML
    Parent primary; (1)

    @FXML
    CheckBox cb1;

    @FXML
Button primaryButton;public interface RootSwitcher {
/**
* Set the root of the scene on the primary stage to the named scene
*
* @param sceneName to use
* @return the previous sceneName
*/
String setRoot( String sceneName );
/**
* Get the FXML controller for a named scene.
* @param sceneName
* @return
*/
Object getControllerForScene( String sceneName );
}So far quite simple, but note that we gave the root an fx:id in the fxml file and have the fxml-loader inject that as a field in the controller.
FXUIScrapper will thank you for that.
Now let us have a look at the switcher, which is no more than a modified version of the java fxml demo app.
public class Switcher extends Application implements RootSwitcher {
  // details left out
} private static Scene scene;
private final Map<String, Parent> sceneParents = new HashMap<>(); (1)
private String currentRoot = "primary"; (2)
final Map<String, Callback<Class<?>, Object>> controllerFactories (3)
= Map.ofEntries(
registeringFactory( "primary", ( clz ) -> new PrimaryController( this ) ),
registeringFactory( "secondary", ( clz ) -> new SecondaryController( this ) ),
registeringFactory( "tertiary", ( clz ) -> new TertiaryController( this ) )
);| 1 | A cache, so loading is done once. |
| 2 | The start scene/root, actually the name of the fxml file sans extension. |
| 3 | The factories (plural) that help the loader construct the proper controller and pass the parameters. Here you would typically also insert the business logic. Of course the RootSwitcher could be in another class, but for the simple example this will do. |
|
Proper OO design uses normal methods, not |
    @Override
    public void start( Stage stage ) throws IOException {
        scene = new Scene( loadFXML( currentRoot ), 640, 480 );
        stage.setScene( scene );
        stage.show();
} @Override
public String setRoot( String fxml ) {
String prevRoot = currentRoot;
currentRoot = fxml;
scene.setRoot( loadFXML( currentRoot ) );
return prevRoot;
} private Parent loadFXML( String fxml ) {
return sceneParents.computeIfAbsent( fxml, this::loadFXMLResource );
} private Parent loadFXMLResource( final String forScene ) {
Parent result = null;
try {
FXMLLoader fxmlLoader = new FXMLLoader( Switcher.class.getResource( forScene + ".fxml" ) );
Callback<Class<?>, Object> factory = controllerFactories.get( forScene );
fxmlLoader.setControllerFactory( factory );
result = fxmlLoader.load();
} catch ( IOException ex ) {
Logger.getLogger( Switcher.class.getName() ).log( Level.SEVERE, ex.getMessage() );
}
return result;
}Note how we ignore the clz class object in the lambda. We know what we want to provide by the key into the map.
5.2. Switching scenes using comboboxes
Sometimes you want to switch scenes with something else than simple buttons. Here is how you do it using ComboBoxes.
    //@Disabled("think TDD")
    @Test
    public void tSwitchCombo() {
        FxRobot rob = new FxRobot();
        final ComboBox b = (ComboBox) rob.lookup( "#combo" ).query(); (2)
        rob.interact( () -> {
            b.getSelectionModel().select( "tertiary" ); //tertiary
        } );
        pause( 500 );
        rob.clickOn( "#primaryButton" );
        assertThat( stage.getScene().getRoot().getId() ).isEqualTo( "tertiary" );
//        fail( "method tSwitchCombo reached end. You know what to do." );
} @FXML
void switchToSecondary() throws IOException {
String value = combo.getValue();
System.out.println( "value = " + value );
reset();
switcher.setRoot( value );
}full source of this stuff.
6. Reading
-
Horstmann Core Java, Ed 11, Vol II, Ch 9, Bonus Chapter Volume I on JavaFX
7. More Links.
7.2. On JavaFX
-
An excellent site at Jakob Jenkov’s JavaFX Tutorials
-
Dirk Lemmerman’s blog on JavaFx is an treasure trove on advanced JafaFX usage.